Webhook
You can set webhook triggers in your git repository so that whenever there is a change in Target Config in github repository, AtomicCD instantly scans for the new Target Config.
This tutorial shows how to set webhooks triggers for AtomicCD in Github Repository.
-
First you need to follow Deploy AtomicCD On Kubernetes Cluster tutorial upto step 6 if you want webhook triggers without trigger authentication else if you want to set webhook trigger authentication follow upto step 5. Skip the next step (step2) if you are moving without trigger authentication.
-
Create Create a Configmap name with a Track Config file. Follow step 2a if repository is public and follow 2b if repository is private.
-
(2a) Make a file named
configmap.yaml. Below in the track config configmap, replace "your github repository url" with your actual repository URL. Change your secret webhook with the secret you want to authenticate webhook trigger with. Copy the final contents in yourconfigmap.yamlfile. Make sure the branch ismain.apiVersion: v1
kind: ConfigMap
metadata:
name: atomic-cd-cm
data:
trackConfig.yaml: |
trackConfig:
repoURL: your github repository url
path: /targetConfig.yaml
webhookSecret: your secret webhook-
(2b) Make a file named
configmap.yaml. Below in the track config configmap, replace "your github repository url" with your actual repository URL. Change your github personal access token with the personal access token for your github private repository. Change your secret webhook with the secret you want to authenticate webhook trigger with. Copy the final contents in yourconfigmap.yamlfile. Make sure the branch ismain.apiVersion: v1
kind: ConfigMap
metadata:
name: atomic-cd-cm
data:
trackConfig.yaml: |
trackConfig:
repoURL: your github repository url
path: /targetConfig.yaml
token: your github personal access token
webhookSecret: your secret webhook -
Apply the file with
kubectl apply -f configmap.yamlcommand.
-
-
Make a NodePort type service for AtomicCD
-
Make a file named
svc.yamland copy the contents of below svc file in it:apiVersion: v1
kind: Service
metadata:
name: atomiccd-svc
spec:
type: NodePort
selector:
app: atomic-cd
ports:
- port: 8080
targetPort: 8080 -
Apply the file with
kubectl apply -f svc.yamlcommand.
-
-
Follow Deploy AtomicCD On Kubernetes Cluster tutorial step 7
-
Go to your Github repository settings:

-
Go to webhooks settings on the webhook page and then click on
Add webhook: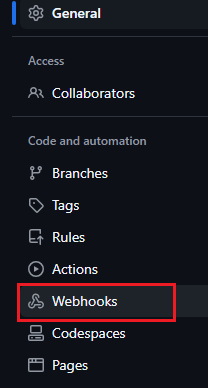
-
Get node ip of your node.
- Run command
kubectl get podsand copy the pod name of your AtomicCD pod, pod will have the prefixatomic-cd. - Run command
kubectl describe pod pod-name | grep Node:(change "pod-name" with the name of pod copied in above step). - In the result of above command copy the node name value until before
/. For exampleip-172-31-12-101.ap-south-1.compute.internal - Now run the command
kubectl describe node your-node-name | grep ExternalIP:(change "your-node-name" with the name of node copied in above step). - Copy the public IP in the result of above command. This is your Node ip where AtomicCD pod is running.
- Run command
-
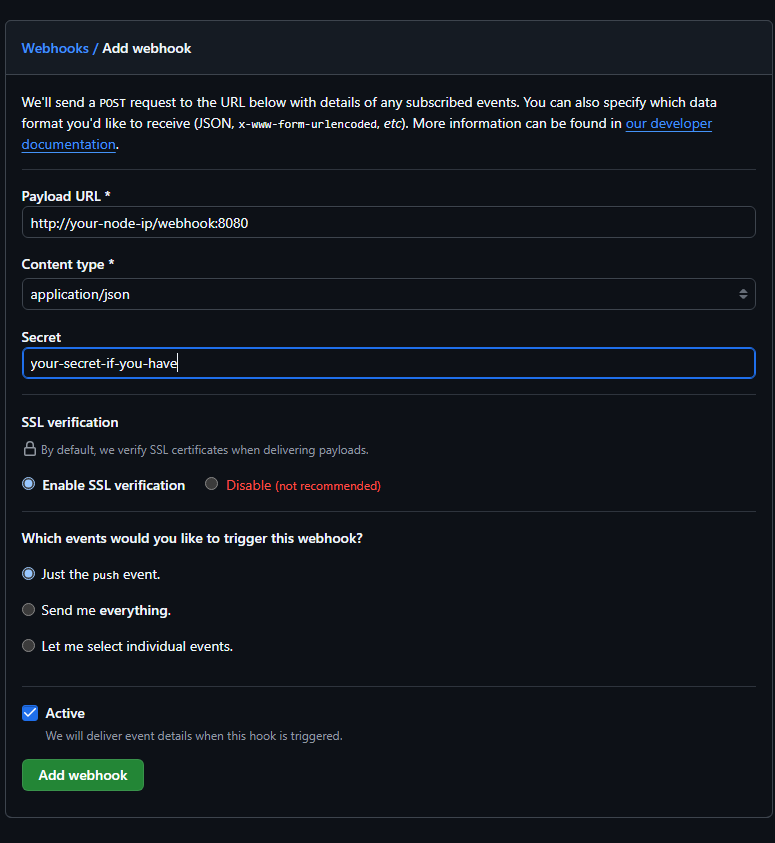
Put your node ip which you get from above step in place of your-node-ip in the url:
http://your-node-ip/webhook:8080. Click on Add webhook in Github and then in the Payload URL section, pathe the url. -
Select the content type as
application/json. -
If you followed step 2, paste the value of
webhookSecretfield you provided in Track Config in theSecretfield otherwise leave this field. -
select
Enable SSL verfication -
Select
Just the push event.inWhich events would you like to trigger this webhook?section. -
Webhook config should look like the below picture.
-
Click on Add webhook.
Trigger Webbhook
-
Monitor logs of AtomicCD with command:
kubectl logs pod-name(change "pod-name" with the name of AtomicCD pod). -
Change
containerTagfield in your Target Config in github repository from3.9to3.10. -
You will instantly see
recieved webhook request,Authenticating webhook...(if trigger authentication setup),Webhook authentication successful!(if trigger authentication setup) andRecieved webhook trigger. Syncingin AtomicCD container log. This means AtomicCD has recieved webhook trigger and scanning for the new Target Config in the git repository.